

Introduction
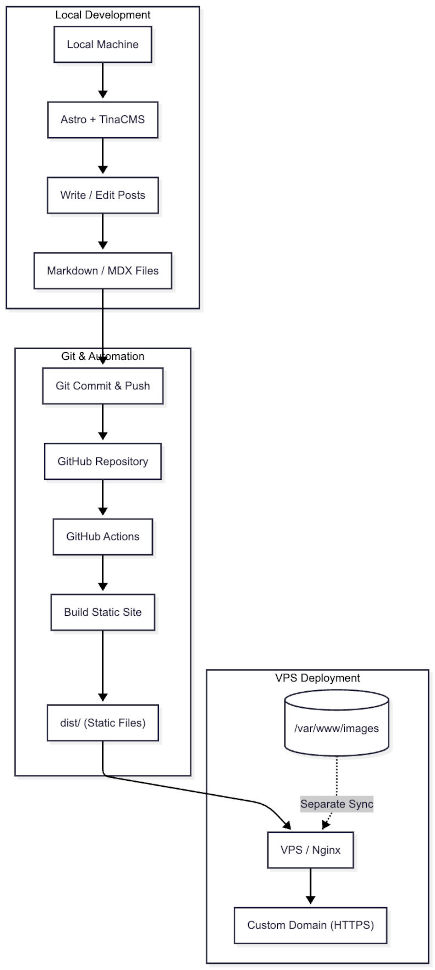
This guide walks through a complete Astro + TinaCMS blogging workflow—from local writing and content management to GitOps-based deployment on a VPS with Nginx, SSL, and long-term maintenance.
The goal is simple: write locally, commit and push to GitHub, and let GitHub Actions automatically build and deploy the static site to your server. By the end, you will have a lightweight, database-free personal blog served by Nginx under a custom domain with an auto-renewing Let’s Encrypt certificate.
Along the way, this guide also covers practical operational concerns such as Git configuration, file hygiene, permissions, credential handling, build troubleshooting, and future scaling.
Prerequisites
Before you begin, make sure you have the following ready:
- A Virtual Private Server (VPS): A basic Linux server with a public IP address. This guide uses Ubuntu 20.04 LTS.
- A Custom Domain Name: A domain that will point to your server.
- A GitHub Account: Used for repository hosting and GitHub Actions deployment.
- Basic Terminal Knowledge: Familiarity with Git, SSH, and common command-line operations.
Phase 1: Local Setup and GitOps Workflow
What We Are Building
Before configuring anything, it helps to understand the workflow we are aiming for.
This guide does not set up a traditional dynamic blog with a database and an always-running CMS backend. Instead, the writing experience happens locally, while production stays as simple as possible.
The workflow looks like this:
- Write and edit posts locally with Astro + TinaCMS
- Save content as Markdown or MDX files in your project
- Commit and push those files to GitHub
- Let GitHub Actions build the site in the cloud
- Sync the final static output to your VPS
- Serve the published site through Nginx
That separation is the key idea behind the whole tutorial: heavy work happens locally or in CI, while production only serves static files.
If you keep TinaCMS editing tools out of production, your VPS does not need to run a database, a CMS backend, or even Node.js just to serve the published blog.
Why Astro + TinaCMS Works Well for This
Astro handles the static site generation, while TinaCMS provides a Git-based editing experience during local development.
In practice, that means your content lives directly in the repository as Markdown or MDX files rather than inside a traditional database. Each post becomes a file, and the frontmatter acts as its structured metadata.
This model keeps the production environment much lighter:
- No database service to maintain
- No SQL migrations for blog content
- No always-on CMS backend on the server
- A simpler deployment target made up of static files
During local development, TinaCMS may run supporting services to power the editing interface. But once you build the site, Astro compiles the content into static HTML, CSS, and JavaScript that Nginx can serve directly.
A Practical Deployment Expectation

One detail is worth making clear early: the deployment workflow in this guide only syncs the built site output, typically the dist/ directory.
That means repository-managed content and server-managed assets are not treated the same way.
For example:
- Posts, pages, and content files inside the repository are built and deployed through GitHub Actions
- Images stored separately on the server, such as under
/var/www/images, need their own upload or sync process
This distinction matters later when we configure Nginx and static asset handling.
Environment & Git Configurations
Before working on the deployment pipeline, we should make sure the local environment behaves predictably across different machines. The goal of this section is simple: make sure your terminal can run the required commands, your repository stays clean, and Git behaves consistently when you start committing and pushing content.
1. Making Sure Your Terminal Can Run Node Commands
If you are developing on Windows, you may encounter an UnauthorizedAccess or SecurityError when running npm commands, stating that npm.ps1 cannot be loaded because running scripts is disabled.
Why it happens: Windows PowerShell may block unsigned or third-party scripts by default.
How to fix it: Prefer changing the policy for the current user instead of the entire machine:
Set-ExecutionPolicy -ExecutionPolicy RemoteSigned -Scope CurrentUser(If you only want to bypass the restriction temporarily for the current session, you can use Set-ExecutionPolicy -ExecutionPolicy Bypass -Scope Process.)
Once this is in place, your terminal should be able to run Node-related commands normally.
2. Standardizing Line Endings Across the Repository
When working across different operating systems, you might see Git warnings like LF will be replaced by CRLF the next time Git touches it.
Why it matters: Linux-based servers and most web tooling expect LF (\n) line endings. Standardizing this early helps avoid noisy diffs and occasional script or rendering issues.
How to fix it: Create a .gitattributes file in your project root and add:
* text=auto eol=lfAlternatively, you can globally disable Git’s automatic line-ending conversion:
git config --global core.autocrlf falseAt this point, your project files will behave more consistently across Windows, macOS, and Linux.
3. Configuring Git Authentication Before Your First Push
GitHub no longer supports account passwords for command-line Git operations. You should authenticate with a Personal Access Token (PAT) and use a credential helper so you do not need to enter it on every push.
A secure default is Git Credential Manager (GCM):
git config --global credential.helper managerThe next time you push, enter your GitHub username and use your PAT as the password.
(If you choose credential.helper store instead, remember that it stores credentials in plain text on disk. If you later run into account conflicts, see the troubleshooting section on clearing cached Git credentials.)
4. Cleaning Unwanted System Files Before You Commit
If you imported templates or assets created on macOS, your project may contain .DS_Store files or related metadata files.
Why it matters: These files add clutter to the repository without helping the project.
How to fix it: In PowerShell, you can remove them recursively with:
Get-ChildItem -Path "." -Include ".DS_Store", "._*" -Recurse -Force | Remove-Item -ForceAfter these steps, your local environment is ready for the rest of the workflow: Node commands can run, line endings are standardized, Git authentication is configured, and the repository is less likely to accumulate unnecessary system files.
With the local environment cleaned up, we can make one final adjustment to the project build before moving on to the server.
Pre-Deployment Project Tuning
Before moving on to the server, we should make one production-oriented adjustment to the local project build.
Removing the TinaCMS Admin Output from Production Builds
TinaCMS is useful during local development, but you generally do not want leftover admin entry points shipped in the final static output.
After npm run build, the generated dist folder may still contain an admin/ path. Even if it is non-functional in production, it can still reveal implementation details that do not need to be exposed on a public server.
To remove it in a cross-platform way, use rimraf instead of a Unix-specific rm -rf command.
1. Install rimraf as a development dependency:
npm install rimraf --save-dev2. Update the build script in package.json:
"scripts": { "build": "astro build && rimraf dist/admin"}After that, each production build will remove the admin directory automatically, leaving you with a cleaner static output for deployment.
Phase 2: Infrastructure & Server Configuration
Domain and DNS Setup
Before setting up the web server on your VPS, you must link your custom domain to your server’s public IP address.
Why this step matters: Most developers know they need a domain, but a common misconception is that you can just bind an SSL certificate directly to a server’s IP address. This will not work; SSL certificates are issued to specific domain names, and accessing an IP directly over HTTPS will trigger an ERR_CERT_COMMON_NAME_INVALID privacy warning in the browser. Therefore, mapping your domain via DNS is a mandatory prerequisite for modern web security.
(Note: When purchasing your domain from providers like Namecheap, you may notice a small $0.20 ICANN fee—this is a mandatory global infrastructure fee to ensure your domain is uniquely resolved across the global internet.)
Configuring A Records for @ and www
To tell the internet where your website lives, you need to configure A (Address) records.
- Access DNS Settings: Log into your domain registrar’s dashboard (e.g., Namecheap), navigate to your Domain List, and open the Advanced DNS tab.
- Clear Defaults: Delete any default parking page records provided by the registrar.
- Add New Records: Create two new
Arecords to point both the root domain and thewwwsubdomain to your VPS’s public IP address (e.g.,149.28.229.214):
Type: A Record | Host: @ | Value: Your_VPS_IP | TTL: AutomaticType: A Record | Host: www | Value: Your_VPS_IP | TTL: AutomaticExpected Result & Verification
DNS changes are not instantaneous. It typically takes anywhere from a few minutes to half an hour for the new records to propagate globally.
To verify that your setup is working, open your local computer’s terminal and verify DNS resolution with a DNS lookup command such as nslookup(Windows) or dig(Unix/Linux):
nslookup yourdomain.comor
dig +short yourdomain.comIf the domain resolves to your VPS IP address, your DNS record is in place. Ping is optional and is not a reliable DNS test because some hosts block ICMP replies.
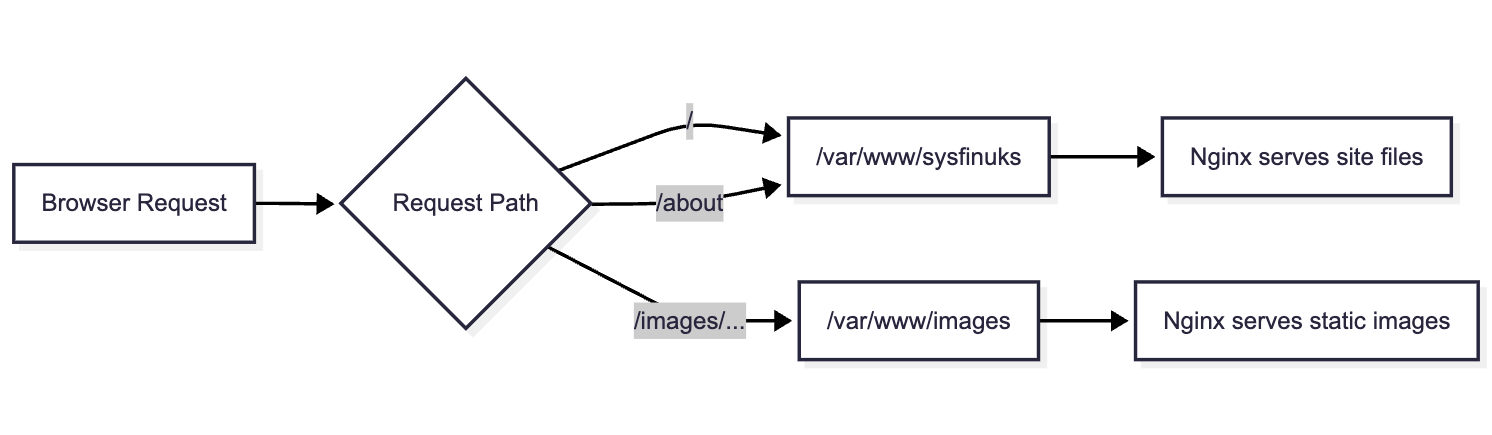
Nginx Configuration & Static Asset Management
Now that your domain is pointing to your server’s IP address, you need a web server to receive incoming internet requests and serve your static files. We will use Nginx, configuring it first for basic HTTP traffic before securing it with SSL, and implementing a best-practice architecture for hosting images.
Port 80 Server Block Initialization
For the HTTP-based Certbot flow used in this article, your domain must be reachable over port 80 so the certificate challenge can complete successfully.
1. Create the Web Root: First, log into your VPS and create the root directory where your Astro static files will eventually live.
mkdir -p /var/www/sysfinuks2. Create the Nginx Configuration: Create a new configuration file for your domain (e.g., /etc/nginx/sites-available/sysfinuks.com).
3. Write the Minimal Configuration: Insert the following server block, which tells Nginx to listen on port 80 and route traffic for your domain to the folder you just created:
server {    listen 80;    server_name sysfinuks.com www.sysfinuks.com;
    root /var/www/sysfinuks;    index index.html;
    location / {        # Standard lookup for static files        try_files $uri $uri/ =404;    }}
4. Enable and Test: Link the file to sites-enabled, test the syntax, and reload:
sudo ln -s /etc/nginx/sites-available/sysfinuks.com /etc/nginx/sites-enabled/sudo nginx -tsudo systemctl reload nginx(Note: Ensure your server’s firewall, such as ufw, has port 80 and 443 open.)
Implementing Static Resource Separation for Images
A major mistake developers make is committing large binary files (like high-resolution images) directly into their Git repository. This anti-pattern bloats the repository, makes git clone painfully slow, and bogs down CI/CD automated deployments.
Instead, we will implement “Static Resource Separation,” meaning your Git repository strictly stores code and text, while your images are hosted independently on the server via Nginx.
1. Create a Dedicated Image Directory: Create a separate folder outside your main project directory to store media.
mkdir -p /var/www/images/posts2. Directory Organization Strategy: Do not dump tens of thousands of images directly into one folder, as this will eventually cause file system tool lag and naming conflicts. Instead, organize your images by Article Slug (e.g., /var/www/images/posts/my-astro-post/) or by Year/Month (e.g., /var/www/images/posts/2026/03/). Always rename images with timestamped strings to prevent accidental overwrites. Important: this image strategy is separate from the GitHub Actions deployment shown later. Because the workflow only syncs dist/, any new images stored under /var/www/images must be uploaded separately or synced through an additional deployment step.
3. Update Nginx to Route Images: Open your config again and add a dedicated location block. We use root /var/www; here because Nginx will append the /images/ URI to the path, correctly looking in /var/www/images/.
location /images/ { root /var/www; expires 30d; add_header Cache-Control "public, no-transform"; try_files $uri =404;}4. Fix Directory Permissions: This is a common pitfall. Because you created the /var/www/images directory as the root user, Nginx (which typically runs under the www-data user) does not have permission to read the files, resulting in broken images and a 403 Forbidden error. Fix this by assigning ownership to Nginx:
sudo chown -R www-data:www-data /var/www/imagessudo chmod -R 755 /var/www/images5. Reference Images in Astro: In your local Astro Markdown files, avoid hardcoding http:// URLs for site assets; use root-relative paths when possible. If you do, upgrading to HTTPS later will cause Mixed Content security warnings, breaking your images. Instead, always use relative paths (e.g., /images/posts/test.png); the browser will automatically append the correct protocol and domain.
Expected Result: You now have a server-side image directory separated from your site build output, but you still need a separate process to upload or sync those image files. You can test this by uploading a test image to your image folder and visiting http://yourdomain.com/images/posts/test.png. If the image loads, your server is ready for SSL encryption.
Phase 3: Securing the Site with SSL
Automating HTTPS with Let’s Encrypt
With your domain resolving to your Nginx web server over HTTP, the next crucial step is securing the connection with an SSL certificate. In modern web deployment, serving content over unencrypted HTTP is highly discouraged, as it leaves user traffic vulnerable to interception and triggers “Not Secure” warnings in browsers.
Understanding SNI and Domain-Bound Certificates
A common misconception is that you can bind an SSL certificate directly to your server’s IP address. In reality, SSL certificates are issued to specific domain names.
When a browser connects to a server over HTTPS, it utilizes the SNI (Server Name Indication) mechanism to verify the identity of the server. If a user tries to access your site directly via https://Your_VPS_IP, the browser will cross-reference the IP with the domain name on the certificate. This mismatch triggers a prominent ERR_CERT_COMMON_NAME_INVALID privacy warning. This is why properly configuring your DNS A records in Phase 2 was a mandatory prerequisite for SSL encryption.
Certbot Automation & 301 Redirection
To secure our site, we will use Let’s Encrypt, a free, automated, and open certificate authority. Instead of manually downloading and configuring certificate files, we will use Certbot, a tool designed to completely automate the acquisition and installation process.
1. Install Certbot: Log into your server and install Certbot along with its Nginx plugin (commands assume an Ubuntu/Debian environment):
sudo apt install certbot python3-certbot-nginx2. Execute the SSL Wizard: Run the following command to begin the automated setup, replacing the domains with your own:
sudo certbot --nginx -d yourdomain.com -d www.yourdomain.com3. Configure Redirection: The interactive wizard will ask for an email address for security notifications and ask you to agree to the Terms of Service. Finally, it will ask if you want to automatically redirect HTTP traffic to HTTPS. You must choose option 2 (Redirect).
Certbot will instantly modify your existing Nginx configuration file, adding the paths to your new public and private keys (typically stored in /etc/letsencrypt/live/), configuring port 443, and establishing a permanent 301 HTTP-to-HTTPS redirect.
After Certbot finishes, your configuration file might look a bit cluttered. To ensure your Astro blog is fast and SEO-friendly, we should perform one final manual cleanup to add Gzip and Clean URL support.
Open /etc/nginx/sites-available/sysfinuks.com one last time and refine it to look like this:
server {    listen 443 ssl;    server_name sysfinuks.com www.sysfinuks.com;
    root /var/www/sysfinuks;    index index.html;
    # [SSL Paths managed by Certbot go here]
    # Gzip Compression for faster page loads    gzip on;    gzip_types text/plain text/css application/javascript image/svg+xml;
    location /images/ {        root /var/www;        expires 30d;        try_files $uri =404;    }
    location / {        # Astro Clean URLs: Allows /about instead of /about.html        try_files $uri $uri/ $uri.html =404;    }}
Configuring Zero-Maintenance Auto-Renewal
Traditional paid SSL certificates usually last for a year, leading to human error when developers inevitably forget to manually renew them. To enforce modern DevOps automation practices, Let’s Encrypt issues certificates with a strict 90-day validity period.
Fortunately, you do not need to log into your server every three months. When you installed Certbot, it automatically created a background scheduled task (a cron job or systemd timer) on your system. This automated task will silently check your certificate’s expiration date and automatically renew it within 30 days of its expiration.
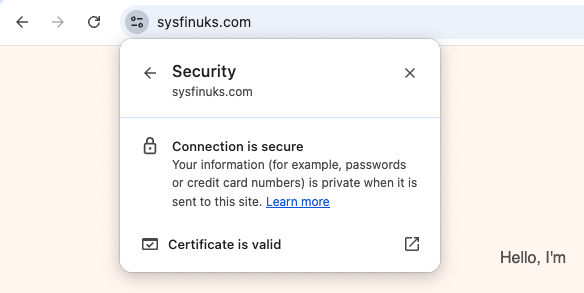
You now have a secure, high-performance web server with a decoupled image storage strategy. If you visit your domain, you should see the padlock icon, and your blog is ready for its first automated deployment.
Phase 4: Automating Deployments with GitHub Actions (CI/CD)
Setting up the GitHub Action Workflow
This is the final step in the GitOps workflow. Instead of logging into the server and building the site manually, we will let GitHub Actions handle the build in the cloud and deploy the finished static output to the VPS whenever you push to the main branch.
The result is a cleaner production model: your server only needs to serve the generated files, while dependency installation and site compilation happen in CI.
Securing Server Credentials in GitHub Secrets
Before writing the workflow, we need to prepare the deployment credentials securely.
You should never hardcode server details or private keys directly in the repository. It is also good practice to create a dedicated deployment SSH key for GitHub Actions instead of reusing your main server key. That way, the deployment credential remains isolated from your personal access credentials.
1. Generate a dedicated deployment key on your local machine:
# Generate a key without a passphrase for CI/CD automationssh-keygen -t ed25519 -C "github-actions-deploy" -f ./deploy_key2. Authorize the public key on your server:
# Run this on your server (replace <public_key_content> with your actual .pub content)echo "ssh-ed25519 AAAAC3NzaC..." >> ~/.ssh/authorized_keyschmod 600 ~/.ssh/authorized_keys3. Add the deployment values to GitHub Secrets:
In your GitHub repository, go to Settings -> Secrets and variables -> Actions, then create the following secrets:
SERVER_HOST: Your server’s public IP addressSERVER_USER: Your server login usernameSERVER_SSH_KEY: The private key generated for GitHub Actions deploymentSERVER_PORT: Your SSH port if it is not the default22
Once the private key has been stored in GitHub Secrets, delete the local deploy_key files from your computer so GitHub becomes the only place storing that automation credential.
Writing the deploy.yml Workflow
Now create the workflow file at .github/workflows/deploy.yml.
This workflow does four things:
- Checks out your repository
- Prepares the
pnpm+ Node.js environment - Installs dependencies and builds the Astro site
- Syncs the final
dist/output to your VPS over SSH
name: Build and Deploy Astro Blog
on:  push:    branches:      - main
jobs:  build-and-deploy:    runs-on: ubuntu-latest
    steps:      - name: Checkout Code        uses: actions/checkout@v4
      - name: Install pnpm        uses: pnpm/action-setup@v4        with:          version: 10
      - name: Setup Node.js        uses: actions/setup-node@v4        with:          node-version: '20'          cache: 'pnpm'
      - name: Install Dependencies        run: |          pnpm config set only-built-dependencies better-sqlite3 sharp esbuild          pnpm install --frozen-lockfile
      - name: Build Astro Project        run: pnpm run build
      - name: Deploy to Server via Rsync        uses: easingthemes/ssh-deploy@v5.1.0        env:          REMOTE_HOST: ${{ secrets.SERVER_HOST }}          REMOTE_PORT: ${{ secrets.SERVER_PORT }}          REMOTE_USER: ${{ secrets.SERVER_USER }}          SSH_PRIVATE_KEY: ${{ secrets.SERVER_SSH_KEY }}          SOURCE: "dist/"          TARGET: "/var/www/sysfinuks"          ARGS: "-rltgoDzvO --delete"
Why This Workflow Is Written This Way
A few parts of this workflow are worth calling out, because they are doing more than they may appear to at first glance.
pnpm/action-setup and actions/setup-node
GitHub-hosted runners already include Node-related tooling, but this project is built around pnpm, so we explicitly install the same package manager used locally. The Node setup step also enables package-manager-level caching with cache: 'pnpm', which can reduce dependency installation time on later runs when the lockfile has not changed significantly.
Strict lockfile-based installs
In CI, the goal is reproducibility, not convenience. That is why the workflow uses:
pnpm install --frozen-lockfileThis is the strict pnpm install mode commonly used in automated environments. It serves a similar purpose to npm ci: it forces the workflow to respect the lockfile instead of silently drifting to a different dependency graph.
That matters because a deployment pipeline should fail fast when package.json and pnpm-lock.yaml fall out of sync, rather than trying to guess what to install.
Native module authorization in pnpm v10
Packages such as better-sqlite3, sharp, and esbuild may require lifecycle scripts or native build steps during installation. With pnpm v10, those builds are more tightly controlled by default.
That is why the workflow explicitly sets:
pnpm config set only-built-dependencies better-sqlite3 sharp esbuildWithout that step, installs may fail in CI even though the project appears to work locally.
Expected Result & Checkpoint
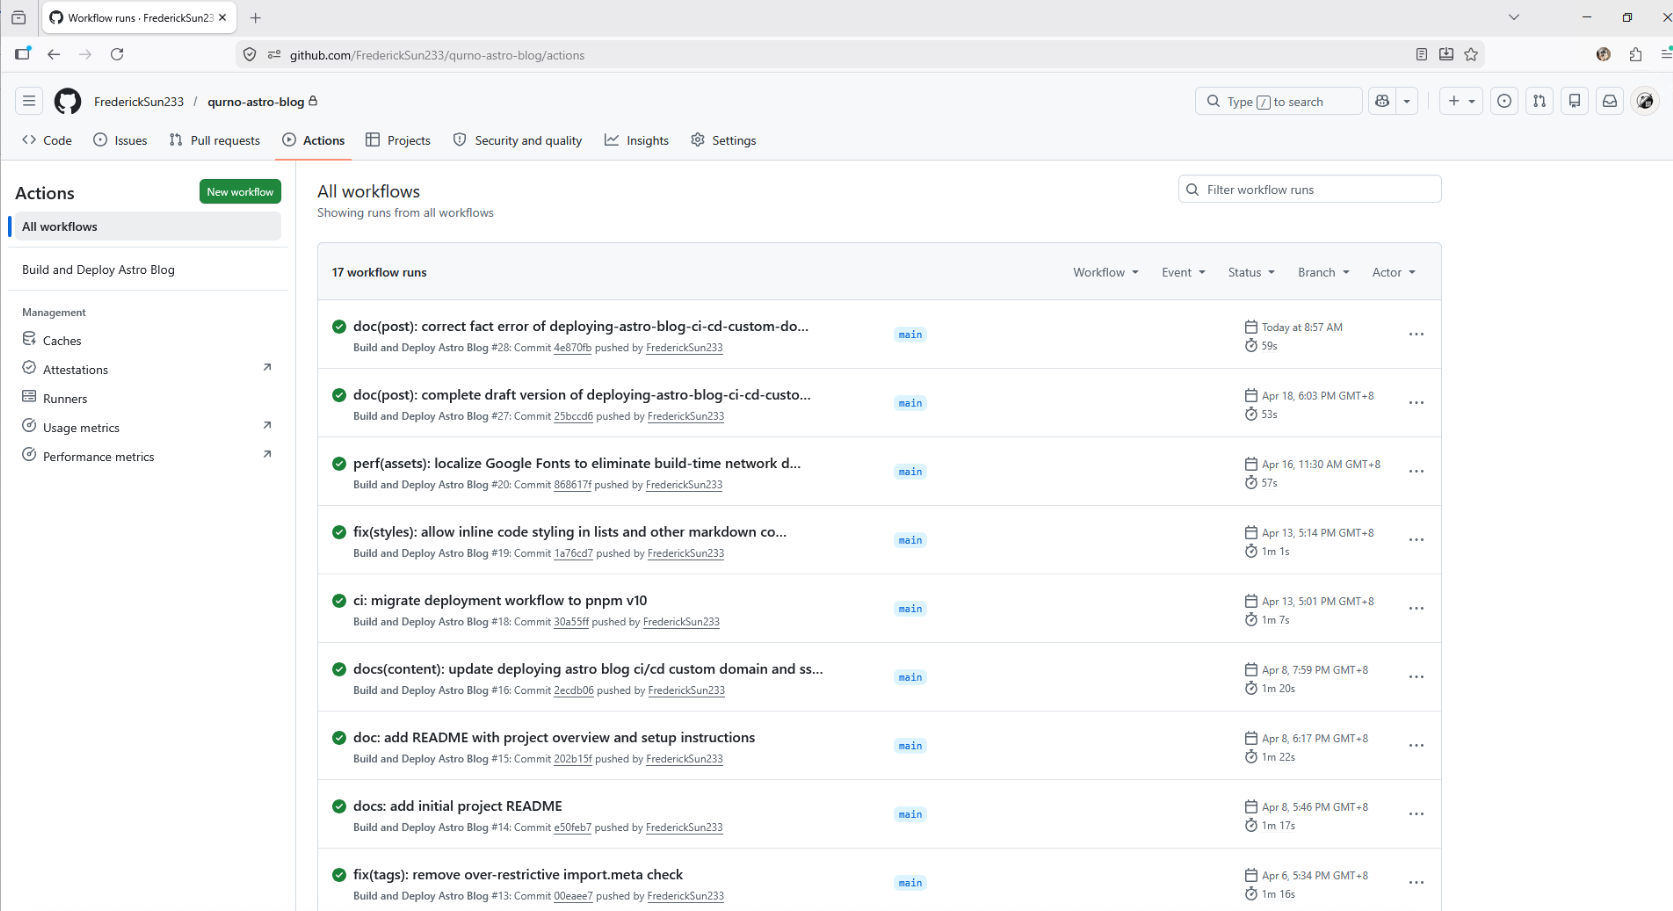
Commit the workflow file and push it to the main branch.
Then open the Actions tab in your GitHub repository. You should see the deployment workflow start automatically. If the run finishes successfully, the generated site files will be synced into /var/www/sysfinuks on your VPS.
At that point, your GitOps deployment loop is active: future pushes to main will trigger the same automated build-and-deploy process.
⚠️ Note: this workflow only deploys the built site output from dist/. If your images are stored separately on the server—for example under /var/www/images—they still need a separate upload or sync process.
Phase 5: Adding Offsite Backups for Server-Managed Images
Up to this point, the deployment pipeline protects everything that lives inside the Git repository. But the image strategy used in this guide intentionally keeps media outside the repository under a server-managed directory such as /var/www/images.
That separation keeps the GitOps workflow lightweight, but it also creates a new operational responsibility: server-managed images need their own backup path.
A practical next step is to add a second server that stores an offsite copy of the image directory. In this section, we will use a lightweight SSH + rsync workflow to push images from the production server to a backup server, maintain a current mirror, and keep daily restore points through snapshot directories.
This is an operational enhancement rather than a requirement for the core publishing pipeline. Your blog can run without it, but once your image library starts to grow, having a separate offsite backup becomes one of the simplest ways to reduce risk.
Why This Backup Layer Matters
The deployment workflow shown earlier only syncs the built site output from dist/. That works well for pages, posts, and other repository-managed content, but it does not protect media stored directly on the server.
In this architecture, that means the following two things are true at the same time:
- Repository-managed content is already protected by Git history and CI/CD deployment.
- Server-managed images need a separate backup strategy if you want protection against accidental deletion, file corruption, or server loss.
Because the images are already organized in a predictable directory tree, a file-based offsite backup strategy fits naturally here. There is no need to introduce object storage or a CDN yet if your current goal is simply to maintain a second copy and preserve restore points.
Backup Design Overview

The design used here separates the backup server into two layers:
current/stores the latest mirrored copy of the production image directory.snapshots/YYYY-MM-DD/stores daily restore points.
This gives you two important benefits.
First, current/ acts as a live mirror of the latest production state, which is useful for quickly verifying that replication is working.
Second, the dated snapshot directories give you rollback points. If a file is deleted or overwritten on the production server, you are not limited to the latest mirror—you can still recover an older version from a previous day.
In other words, the backup server is not just holding “another copy”; it is holding both a synchronized mirror and a short history of restorable states.
Recommended Directory Layout
On the production server, we continue using the original image directory:
/var/www/imagesOn the backup server, use a layout like this:
/data/blog-images/├── current/└── snapshots/ ├── 2026-04-20/ ├── 2026-04-21/ └── ...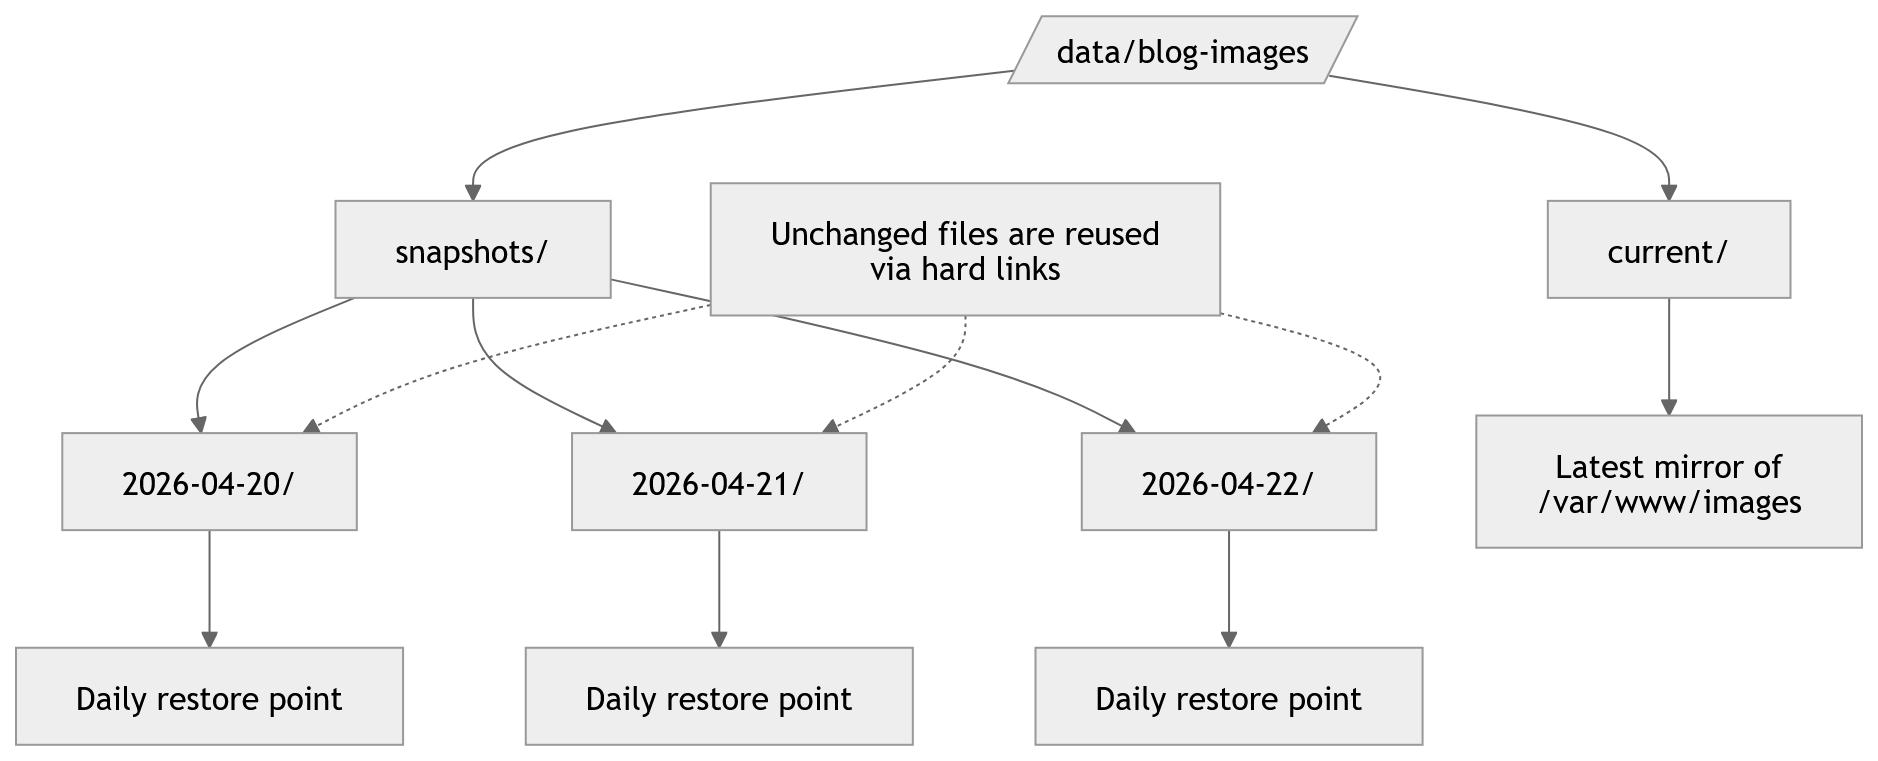
The idea is straightforward:
- The production server continues serving images from
/var/www/images. - A scheduled
rsynctask pushes the latest state to/data/blog-images/current/on the backup server. - The backup server then creates a dated snapshot from that current mirror.
- Older snapshots are pruned automatically after a defined retention period.
Creating a Dedicated SSH Trust Path
To keep this workflow isolated from deployment credentials, use a dedicated SSH key specifically for image backups instead of reusing your GitHub Actions deployment key.
On the production server, generate a key pair such as:
ssh-keygen -t ed25519 -C "prod-to-backup-blog-image-rsync" -f ~/.ssh/backup_sync_ed25519Then add the public key to the backup server user that will receive the files.
After the key is installed, define a named SSH host in ~/.ssh/config on the production server so that later commands can stay short and readable:
Host tencent-backup HostName YOUR_BACKUP_SERVER_IP User YOUR_BACKUP_USER Port YOUR_BACKUP_SSH_PORT IdentityFile ~/.ssh/backup_sync_ed25519 IdentitiesOnly yesWith that in place, a simple command like the following should connect without prompting for a password:
ssh tencent-backupThis small SSH setup step makes the later rsync, snapshot, and scheduled backup commands much easier to maintain.
Preparing the Backup Server
On the backup server, create the base directories:
mkdir -p /data/blog-images/currentmkdir -p /data/blog-images/snapshotsIf needed, ensure the receiving user owns the directory tree:
sudo chown -R your_user:your_user /data/blog-imagesAt this point, the backup server is ready to receive the mirrored image files.
Syncing the Current Mirror with rsync
The heart of this workflow is a simple rsync command from the production server to the backup server:
rsync -az --delete /var/www/images/ tencent-backup:/data/blog-images/current/This command keeps the current/ directory on the backup server aligned with the latest state of /var/www/images on production.
A few details matter here:
- The trailing slash in
/var/www/images/means “sync the contents of this directory,” not the parent folder itself. -apreserves the directory structure and metadata in archive mode.-zcompresses data during transfer.--deleteremoves files from the backup mirror if they no longer exist on production.
That last flag is useful for keeping current/ accurate, but it is also the reason snapshots matter. A pure mirrored sync is not enough on its own, because accidental deletions would otherwise propagate to the backup copy.
For that reason, it is a good idea to start without --delete during your first few test runs, then enable it once you are confident the path and permissions are correct.
You can also verify the behavior in advance with a dry run:
rsync -az --delete --dry-run /var/www/images/ tencent-backup:/data/blog-images/current/Creating Daily Restore Points
Once the current mirror has been updated, the backup server should create a dated snapshot.
One lightweight way to do this on Linux is to use hard-link-based snapshots. Instead of copying every file again, unchanged files can be reused efficiently while still giving you a directory for each day’s state.
A snapshot script on the backup server can follow this logic:
- Check that
current/exists - Create today’s dated directory under
snapshots/ - Skip creation if that day’s snapshot already exists
- Copy the current mirror into the dated snapshot path using hard links
sudo tee /usr/local/bin/blog-image-snapshot.sh > /dev/null <<'EOF'#!/usr/bin/env bashset -euo pipefail
BASE="/data/blog-images"CURRENT="$BASE/current"SNAPSHOT_DIR="$BASE/snapshots"TODAY="$(date +%F)"
mkdir -p "$SNAPSHOT_DIR"
if [ ! -d "$CURRENT" ]; then  echo "Current directory does not exist: $CURRENT"  exit 1fi
if [ -e "$SNAPSHOT_DIR/$TODAY" ]; then  echo "Snapshot already exists for $TODAY"  exit 0fi
cp -al "$CURRENT" "$SNAPSHOT_DIR/$TODAY"echo "Created snapshot: $SNAPSHOT_DIR/$TODAY"EOF
sudo chmod +x /usr/local/bin/blog-image-snapshot.sh
In practical terms, this gives you a structure like:
/data/blog-images/current//data/blog-images/snapshots/2026-04-21/From the reader’s point of view, each snapshot behaves like a full directory tree. Operationally, however, unchanged files do not have to be duplicated in the same wasteful way as a plain recursive copy.
This makes the approach lightweight enough for a personal blog while still giving you meaningful restore points.
Pruning Old Snapshots
Backups are only useful if they remain manageable. If old snapshots are never cleaned up, the backup server will eventually accumulate unnecessary history and consume storage that could be better reserved for current and recent restore points.
A simple pruning policy is to keep the last 30 days of snapshots and remove anything older.
This is usually enough for the kinds of issues most personal sites encounter:
- accidental file deletion
- mistaken overwrite
- late discovery of a broken asset path
- recovering a missing image from a recent post edit
The exact retention window is flexible. A smaller media library can keep more days; a growing library may need a tighter retention policy or an eventual migration to colder storage.
sudo tee /usr/local/bin/blog-image-prune.sh > /dev/null <<'EOF'#!/usr/bin/env bashset -euo pipefail
SNAPSHOT_DIR="/data/blog-images/snapshots"KEEP_DAYS=30
find "$SNAPSHOT_DIR" -mindepth 1 -maxdepth 1 -type d -mtime +$KEEP_DAYS -exec rm -rf {} +EOF
sudo chmod +x /usr/local/bin/blog-image-prune.sh
Automating the Workflow with cron
Once the manual steps work, the whole process can be scheduled from the production server.
sudo tee /usr/local/bin/backup-blog-images.sh > /dev/null <<'EOF'#!/usr/bin/env bashset -euo pipefail
SOURCE="/var/www/images/"DEST="tencent-backup:/data/blog-images/current/"LOG_FILE="/var/log/backup-blog-images.log"
{  echo "[$(date '+%F %T')] Starting rsync..."  rsync -az --delete "$SOURCE" "$DEST"  echo "[$(date '+%F %T')] Rsync completed."
  echo "[$(date '+%F %T')] Creating snapshot on backup host..."  ssh tencent-backup "/usr/local/bin/blog-image-snapshot.sh"  echo "[$(date '+%F %T')] Snapshot completed."
  echo "[$(date '+%F %T')] Pruning old snapshots on backup host..."  ssh tencent-backup "/usr/local/bin/blog-image-prune.sh"  echo "[$(date '+%F %T')] Prune completed."} >> "$LOG_FILE" 2>&1EOF
sudo chmod +x /usr/local/bin/backup-blog-images.sh
A typical flow looks like this:
rsyncpushes the latest image state to the backup server- the backup server creates that day’s snapshot
- the backup server prunes snapshots older than the retention window
Running this once per day is usually sufficient for a blog image library. A daily schedule creates a clear operational rhythm without making the backup layer overly sensitive to every small content change.
For example, a cron job on the production server can run the backup script during off-peak hours, such as early morning.
sudo crontab -e20 3 * * * /usr/local/bin/backup-blog-images.shThe key point is not the exact hour, but the consistency: once the job is stable, the backup process becomes another quiet piece of routine infrastructure.
sudo /usr/local/bin/backup-blog-images.shtail -n 100 /var/log/backup-blog-images.logssh tencent-backup "ls -lah /data/blog-images"ssh tencent-backup "ls -lah /data/blog-images/snapshots"Recovery Strategy
A backup system is only meaningful if restoration is easy to reason about.
This structure supports two common recovery modes:
- Restore a single file from a dated snapshot if one image was deleted or overwritten.
- Restore an entire directory tree from a previous snapshot if a broader mistake affected a whole batch of images.
Because the snapshots are stored as normal directories, recovery stays operationally simple. You are not forced to learn a specialized backup format just to retrieve one missing asset.
This is especially useful for a personal publishing workflow, where the most likely problem is not a total disaster every week, but an occasional file mistake discovered after deployment.
A Practical Boundary to Keep in Mind
This offsite backup workflow protects server-managed images, but it does not replace all other forms of resilience.
It does not replace:
- Git history for repository-managed content
- your main deployment workflow
- basic server security
- occasional restore testing
It simply closes the protection gap created by storing images outside the repository.
That makes it a natural complement to the rest of this guide. The GitOps pipeline continues protecting text, code, and build output, while the backup workflow protects the image directory that lives outside that path.
Expected Result
After this setup is in place, your production server continues serving images from /var/www/images as before, while the backup server quietly maintains:
- a current mirrored copy of the image directory
- a rolling history of daily restore points
At that stage, your image operations become much safer. Accidental deletions, mistaken overwrites, or even loss of the primary server no longer mean your media library exists in only one place.
For a blog that separates server-managed media from repository-managed content, that is one of the most practical operational upgrades you can add.
Troubleshooting & Common Pitfalls
If something breaks, start with the symptom that most closely matches what you are seeing:
- Images return
403 Forbidden - GitHub Actions deployment fails with
Permission denied - Git push returns
repository not found - Local development works, but
pnpm run buildfails in CI
This section is organized by symptom instead of by subsystem, so you can jump directly to the failure you need to fix.
Images return 403 Forbidden
If your posts load correctly but images fail to render from a path such as /images/..., Nginx is usually being blocked from reading the image directory.
Most likely cause
The image directory was created by root, but Nginx runs under a restricted user such as www-data. Even if the files exist, Nginx cannot serve them without read permission.
How to fix it
Log into your server and grant Nginx ownership plus standard read permissions for the image directory:
chown -R www-data:www-data /var/www/imageschmod -R 755 /var/www/imagesWhat success looks like
Reload the page and request the image URL directly in the browser. If the permissions are correct, Nginx should serve the file normally instead of returning 403 Forbidden.
GitHub Actions deployment fails with Permission denied
If the workflow builds successfully but fails during the deploy step, or your live site stays empty after a supposedly successful push, the deployment user likely cannot write to the Nginx web root.
Most likely cause
Your GitHub Actions workflow is connecting with SERVER_USER, but the target directory (for example /var/www/sysfinuks) is still owned by root. In that case, rsync over SSH cannot create, replace, or delete files there.
How to fix it
Log into your server and change ownership of the deployment target directory to the same user stored in your SERVER_USER GitHub Secret:
chown -R your_user:your_user /var/www/sysfinuksReplace your_user with the actual deployment account, such as ubuntu or debian.
What success looks like
Re-run the GitHub Actions workflow. The deploy step should complete without a permission error, and your generated Astro files should appear in the target directory.
Git push returns repository not found
If you are sure the repository exists and the remote URL is correct, this error is often an authentication problem rather than a repository problem.
Most likely cause
Git is reusing cached credentials from another GitHub account, and that account does not have permission to access the repository you are trying to push to. This is especially common if you previously used a work account and are now pushing to a personal repository.
How to fix it
Start by checking which credential helper Git is using:
git config --show-origin --get-all credential.helperThen clear the saved GitHub credentials from the helper currently active on your machine.
Windows
Open Control Panel -> Credential Manager -> Windows Credentials, then remove any entries related to GitHub such as git:https://github.com or github.com.
macOS
In Keychain Access, search for github.com and delete the related internet password item.
If you are using osxkeychain, you can also clear it from the terminal:
printf "host=github.com\nprotocol=https\n\n" | git credential-osxkeychain eraseIf needed, you can delete the keychain entry directly:
security delete-internet-password -s github.comLinux
The cleanup method depends on the helper in use:
libsecret/ keyring: remove the savedgithub.comentry from your system password managerstore: remove thegithub.comentry from~/.git-credentialscache: restart the session or wait for the cached credential to expire
After clearing old credentials, set a credential helper for future pushes.
A secure default is:
git config --global credential.helper managerIf you deliberately choose the simpler fallback:
git config --global credential.helper storeremember that store saves credentials in plain text on disk.
Finally, run git push again and authenticate with:
- Your GitHub username
- A Personal Access Token (PAT) as the password
Do not use your normal GitHub account password.
What success looks like
Git prompts for fresh authentication, accepts your PAT, and the push succeeds against the correct repository.
Local development works, but pnpm run build fails in CI
If the site runs fine with pnpm run dev locally but fails during the GitHub Actions build, the problem is often stricter type checking during production builds.
Most likely cause
Your local dev server may tolerate issues that the production build treats as fatal. Common examples include implicit any values, missing optional properties, or mismatches between edited JSON data and the component logic that renders it.
One common scenario is editing a navigation structure like menus.json and removing a property such as submenu, while a component like Header.astro still assumes it always exists.
How to fix it
Make the data shape explicit in your Astro component using TypeScript types or interfaces.
A common pattern is:
- Define an interface for the imported data
- Mark optional properties explicitly, such as
submenu?: any[] - Cast imported JSON data to that interface
- Type callback parameters inside
.map()calls so they do not fall back to implicitany
For example, your component logic may need to move from “loosely inferred JSON” to “explicitly typed menu items” so the build can verify the structure safely.
What success looks like
After the interface and typing issues are fixed, pnpm run build should pass locally and in GitHub Actions without TypeScript-related fatal errors.
Conclusion & Next Steps
What You Have Now
At this point, you have a complete GitOps-based Astro blogging workflow in place.
You can write locally with Astro + TinaCMS, commit and push your content to GitHub, let GitHub Actions build the site automatically, and deploy the final static output to a VPS served by Nginx over HTTPS.
In this setup, production stays intentionally simple: the server only needs to serve static files, while content editing, dependency installation, and site builds happen locally or in CI. As long as you are not deploying TinaCMS editing services or another dynamic backend in production, you do not need a database or a Node.js application server just to publish the blog.
That gives you a lightweight personal platform that is easier to maintain, easier to reason about, and easier to scale over time.
Where to Improve Next
With the core pipeline working, the next improvements are less about infrastructure and more about long-term maintainability, content organization, and performance.
Theme Customization and Component Reuse
If you started from a premium Astro template, treat it as a starting scaffold rather than a fixed design. Remove unused demo pages, simplify navigation, and promote the links that actually matter for your writing.
As the project matures, reusable pieces such as MDX rendering, content cards, archive layouts, and search components can be extracted and reused across other personal sites or portfolios. That usually creates more long-term value than keeping the template structure untouched.
Scaling the Archive Structure
For a small or medium-sized blog, a single archive page is usually fine. But as the number of posts grows, rendering everything on one page will eventually hurt usability and front-end performance.
A more durable structure is to split the archive by year and let Astro generate separate static routes, such as:
src/pages/blog/archive/[year].astroThis keeps each archive page smaller, improves navigation, and avoids turning the main archive into one oversized page.
For smaller sites, a lightweight intermediate step is to group old posts behind collapsible sections using native HTML:
<details> <summary>Year</summary> ...</details>Planning for Long-Term Image Storage
If your image library keeps growing, VPS storage will eventually become a constraint. That is why it helps to keep image organization disciplined from the beginning, using a structure such as article-based folders or year/month paths like:
/var/www/images/posts/YYYY/MM/Once the directory structure is predictable, older media can be moved later to object storage or a CDN with much less friction. Because your content uses relative paths instead of hardcoded asset domains, that migration becomes easier to manage without rewriting old posts.
